I finally got through some of the Vimscript book to learn how to successfully remap keys and add my own customization. One of the biggest things I have missed from VS Code has been some of the the <alt> + <arrow-key> combinations. Now I can actually add some of them into Vim. Today was a good day just because of that. 🙂
TLDR;
Okay, so here are the highlights of what I did:
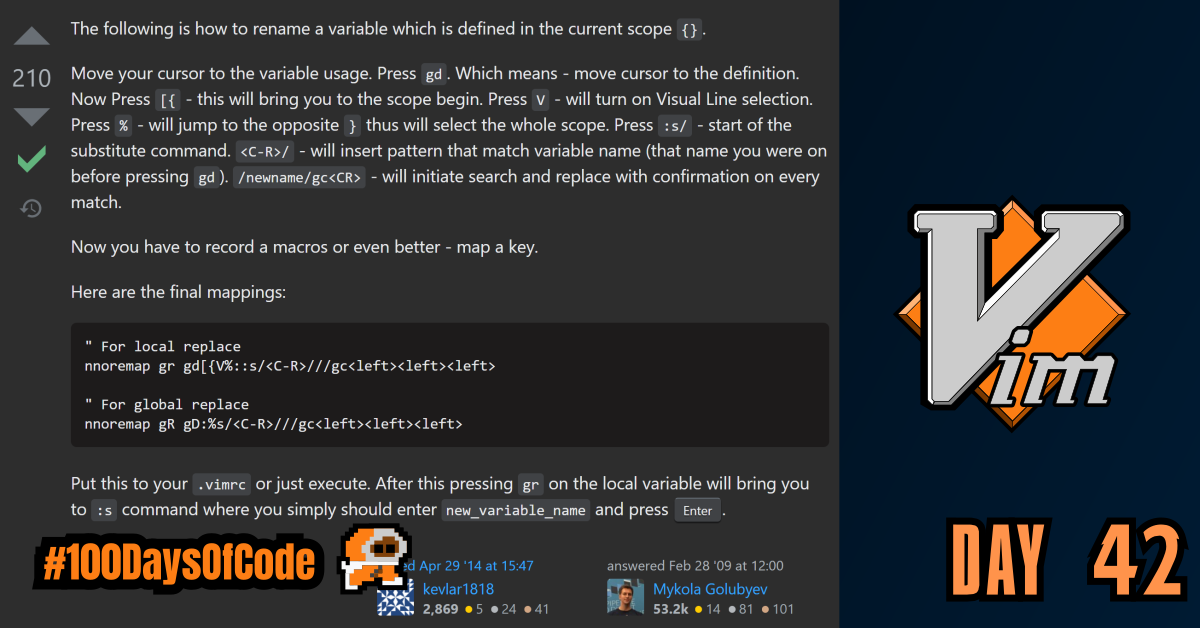
- I broke down a Stack Overflow solution for globally and locally replacing variable/function names.
- I read through some more of the Vimscript book to try and get better at configuring Vim. I also added some of the suggested snippets for quickly opening my
~/.vimrcfile and sourcing it so that the changes take effect immediately.
Notes on Vimscript
Basic Remapping of Keys with :map <keyname> <replacement>
Remapping keys is one of the most powerful features that we can control in vim. The format is simple. To remap keys in normal mode we simply type :map followed by the key we want remapped and the replacement. e.g. :map - x remaps - to do what x does in normal mode (delete one character).
For special characters we can wrap them inside <> so that we can use them. For example:
<c-d>=Ctrl D<space>= space bar
Be careful because remapping is one of the special circumstances that prevent us from using " to start commenting our Vimscript. Accidently using " can lead to some unintended side effects, so be careful.
When remapping within the .vimrc file there is no need to write the leading :.
Mapping Key Sequences
Vim allows us to map one key to sequence of keys. This is one of the great features of Vim. This is also something we can keep in mind when trying to map complex sequences that we perform all of the time to one key.
Modal Remapping
FYI if we want to shift a line forwards or backwards by tabs we can do so using <c-t> (tab) and <c-d> (de-tab).
Example of setting a modal mapping:
" Go into Visual mode and highlight some text. Then press \ and it will convert it all to uppercase using the U command.
:vmap \ U
When setting modal mapping we need to be very specific on what we want to be done. Example:
" while in insert mode press <c-d> to delete the line and then return back into insert mode
:imap <c-d> <esc>ddi
Unmap keys with :unmap
Sometimes we want to unmap a key so we can use unmap <keyname> to accomplish this. Just like with the normal map command we can prefix unmap to unmap keys in specific modes. For example:
nunmap= unmap in normal modeiunmap= unmap in insert modevunmap= unmap in visual modeVunmap= unmap in Visual Block moderunmap= unmap in Replacement mode (I think… I’m not 100% sure about that)
There is also :*mapclear <keyname> that removes ALL mappings for the mode the map command applies. (The * represent all the various prefixes that represent the different Vim modes)
Nonrecursive Mapping with :noremap
There are potential side effects when we use the map or modal remapping commands. We could potentially produce a never ending recursive loop. For example:
:map - dd
:map \ -
The two remappings above will result in an infinite loop of deleting an entire line when - is pressed. This will halt the program from progressing. To prevent this from happening, Vim provides strict non-recursive remapping commands. These are the same as the basic map and modal remapping commands except with another prefix tacked on after the modal remapping prefix called nore. For example:
:noremap <keyname> <replacement>:inoremap <keyname> <replacement>:vnoremap <keyname> <replacement>:nnoremap <keyname> <replacement>
This is the standard that should be used for any remapping commands. This helps to ensure that we don’t produce any unintended side effects. -> ALWAYS USE *noremap .
Leaders
Although we want to be able to remap keys in Vim, we also do not want to have those keys lose their original function. There are only a few keys in Vim that have no purpose by default. Outside of those keys, remapping any other keys would replace a function which is not desirable. We can avoid this altogether by utilizing a customizable prefix key called a leader. It’s purpose is to provide a root for multiple customizable remappings that can only take place after the leader has been pressed. This behaves similar to gg , cw , dd , y$ , etc. Here is how we map a custom leader and use it in Vim:
" We will for an example set our leader to the - character
:let mapleader = "-"
:nnoremap <leader>d dd
We can also use a local leader :let maplocalleader = "<leader-key>" to map a leader that can be limited to apply to specific buffers or file types. For example:
" Maps the backslash character as the local leader. Because '\' is a special character we needed to escape it first to use the literal '\' character.
:let maplocalleader = "\\"
Benifits of Using a Leader in Remapping:
- First of all, you may decide you need the normal function of your leader later on down the road. Defining it in one place makes it easy to change later.
- This makes it easier for anyone that has a different leader but wants to still use our shortcut. Since we are just mapping
<leader>followed by the sequence their chosen leader can be anything they want. - Finally, many Vim plugins create mappings that start with
<leader>. If you’ve already got it set up they’ll work properly and will feel familiar right out of the box.
FYI <cr> = Carriage return (Enter button) & <bs> = Backspace
Conclusion
That’s all for today. If you are interested in the MIT course you can check out the video lecture I’m currently going through. The lecture is helpful but isn’t sufficient by itself. Anyways, until next time PEACE!